Sunday, April 27, 2014

Chevron

   This week's installment of Etsy-to-Fingers is a chevron! It had been an accent set in my shop, but I think I'm going to change it to where the design is on two fingers instead of just the one.


   I think the chevron on just one finger looked pretty lonely, so I gave it a friend.


   Surprisingly, I got away without having to use tape. I didn't leave enough time and didn't feel like cutting strips and whatnot. I used the polish thinner on all but two of the polishes I used and that helped a ton.


   I used Revlon Colorstay Pale Cashmere as the base. I think this has become my new favorite polish! It's a great light color that goes with pretty much everything, but it's not too white or too brown. Then I used a hodge podge of oranges, yellows, and a blue.
   I still have to make the changes to the Etsy listing, but this is what it will ultimately turn out to be. You can find the listing here!

   I might have some pictures to show you guys later in the week. I went outside this week to take some pictures again and it was awesome! I've missed it more that I thought.
   Have a wonderful week!

Sunday, April 20, 2014

Easter Nails

   I'm so excited to show you guys my Easter nails! I recently discovered a fabulous Etsy store that sells pysanka - Ukranian Easter eggs. I fell in love with them on the spot. I really wanted to buy one (I still do!) but I don't have the money for that sort of thing right now. If you don't know what they are, here are some pictures of some that I drew inspiration from.


   Aren't they all so pretty?! They make these by drawing the design with wax, and then dying the egg. It's more complicated than that, but that's the best way I can describe it. You'll have to look it up, it's pretty fascinating. I have a ton more on one of my Pinterest boards, if you want to check it out.
   For my nails, I couldn't choose just one egg to draw inspiration from. So I did the obvious thing and chose a different egg for each nail! It makes for a bit of a hodge podge, but I think they go together fairly well.


   This is by far the most detailed design I've done in a long time, maybe ever. I really like it! It took a really long time to do - it took me around 4 hours for both hands, I think; as usual, I didn't really time it.


   To make these designs I used acrylic paints and nail polishes. I tried out my new nail polish thinner and it makes it so much easier to make detailed designs! I had never thought about using a thinner, but when I was reading Will Paint Nails For Food's blog, she mentioned that she uses it for her more detailed designs, so I decided to try it out!
  I used mainly red, brown, and light blue acrylic paints, CoverGirl Outlast Out of the Blue, Maybelline Color Show Bold Gold, and my white and black Stripe Rite stripers.


   I think my favorites of the many designs are pointer finger on my left hand, and my pointer and middle finger on my right hand. If I ever get around to it (haha!) I think I'll make both my pointer fingers into their own full sets.

   I'm all out of updates until probably next week. I work a lot this week, so I have no idea when I'll be painting my nails again. I'm back on my Etsy-to-Fingers Project after this week's Easter nails. Have  a wonderful week!

New Listings Part II

   Yesterday I started showing you guys some of my new listings. I have a ton, so I split it up in to accents and full sets. I did the accents yesterday, so today I'm going to show you all the full sets!


   This is an older design. It was one of the first I made after I started becoming a little more consistent with nail art. I've always really liked it. It's kind of simple, but it looks nice.


   I didn't really have the yellow I wanted (I wanted something a little paler and a little less lemon-y), but the one  I have works fine. I painted the base with CoverGirl Outlast Lemon Drop, and painted one layer of white (Finger Paints Paper Mache) over the yellow. I only did one layer so that a little of the yellow would come through. Then I painted the bow with my black Stripe Rite striper.
   I go the idea for this design from a tutorial I found on Pinterest. It's a really easy design to make, especially if you have a smaller brush to use for the bow. I don't know about you, but I can't manage small/tight curves with the long bristled brushes. I just make a huge mess!
   You can find the listing here. You can also look at some more pictures of the original design if you want.


   This is another old-ish design, but I have blogged about it. This design was originally painted on my toes. It was inspired by a pretty pair of heels (which I could never wear, I'd fall on my face with heels that tall and skinny!).


   Pardon the state of my toes. I never put lotion or anything on them enough, so they often get pretty dry in the summer and winter.
   I've been wanting to transfer this to fingers design for a while, I just never got around to it. I like the full-scaled nail, but I think the one line of scales is my favorite. I think it looks really nice!


   To make this design I needed a lot of patience. The scales took forever! What I did to make them was to start off with painting a wide white arch, which I repeated as many times as necessary to make the basic scales. Then I started with the red (Sally Hansen Xtreme Wear Cherry Red) and outlined the bottom of each scale. Then I went on up the line with yellow (CoverGirl Outlast Lemon Drop) and then orange(Sally Hansen Xtreme Wear Sun Kissed). To finish it off I got out my white Stripe Rite striper and outlined the top of the scales in a thin white line to help define them. For the base I used Flower Good Bud-dy.
   You can find the listing here in my shop.


   This next design is pretty recent. I painted it back in February.


   It was inspired by a sweater.


   I used Revlon Brilliant Strength Entice as the base, and then various acrylic paints for the chevron stripes. I've found that it's much easier to do a lot of detail work with acrylic paints. It's not always the best, but it generally works a lot better than polish for me. I did get some nail polish thinner last week though, and that makes the polish a thousand times easier to work with.
   You can find this set here in my shop.

   That's all of my new listings for now! I do have some other older designs that are waiting to be made into full sets, but who knows when I'll get around to them.
   I've still got my Easter nails to show you guys too! I'll probably post about them tonight or tomorrow.

   I hope you all have a great Easter and a great week!

Saturday, April 19, 2014

New Listings!

   I have a ton of new listings to show you guys. I have 8 new listings - 5 accents and 3 full sets. It sounds like I've been really busy, but most of these came from doing some cleaning out. I keep all of the nails that I experiment on, so it makes a huge pile! I was going through them to see if found anything to recreate and I found several that I wanted to do more with. I made accent sets out of 5 of them and kept some others out to make into full sets. The only things I actually painted were the 3 new full sets.

Accents first!

   This first design started with a beautiful dress. As you might know, I have a ridiculous amount of clothing pinned on my Pinterest. I was looking for some nail-spiration quite a while ago (a year? more?) and I came across this lovely thing in my boards:


   Isn't it gorgeous?! I could never wear such a thing (I like to feel more clothed than I would feel in that), but it's just so pretty.


   I'm not sure what colors I used then, but if I made it now I would use Finger Paints Sketchy Character as the brown base and my creamy striper for the detail. Here's the listing.

   I'm pretty sure this one was inspired by a dress too - I kind of think somewhere around 1850-69, but I could be wrong. In my quick look I didn't find the dress. Whenever I have more time (and if I think of it) I will do a more thorough search.


   I have a little more of an idea of what I used for this one. I know the base was Sally Hansen Hard as Nails Sheer Vanilla over white. I don't have that color anymore though, so if I made it now I would use Revlon Colorstay Pale Cashmere, which is a very similar color. For the 'spears' I would use Finger Paints Sketchy Character and Nina Ultra Pro Beige-A Vu, with Sally Hansen Complete Salon Manicure Butterscotch, probably. You can find this set here in my store.

   This is a somewhat more recent design - recent enough to be in this blog. It was part of my Doll Challenge, where I painted designs based off of the clothing of my American Girl Girls of Many Lands dolls.
   It was based off of this doll from Tudor England.


   They are such pretty dolls. Very detailed and pretty darn accurate, from what I know of fashions.


   For this design, I used CoverGirl Boundless Color Plum Pudding for the detail and on my other nails. For the base of the accent, I used my cream striper. That proved to be super time consuming and annoying (it took forever to cover my nail, forever to dry...), so I think I'll use Revlon Colorstay Pale Cashmere. It's a really close match to this as well. Here's the link to the listing.

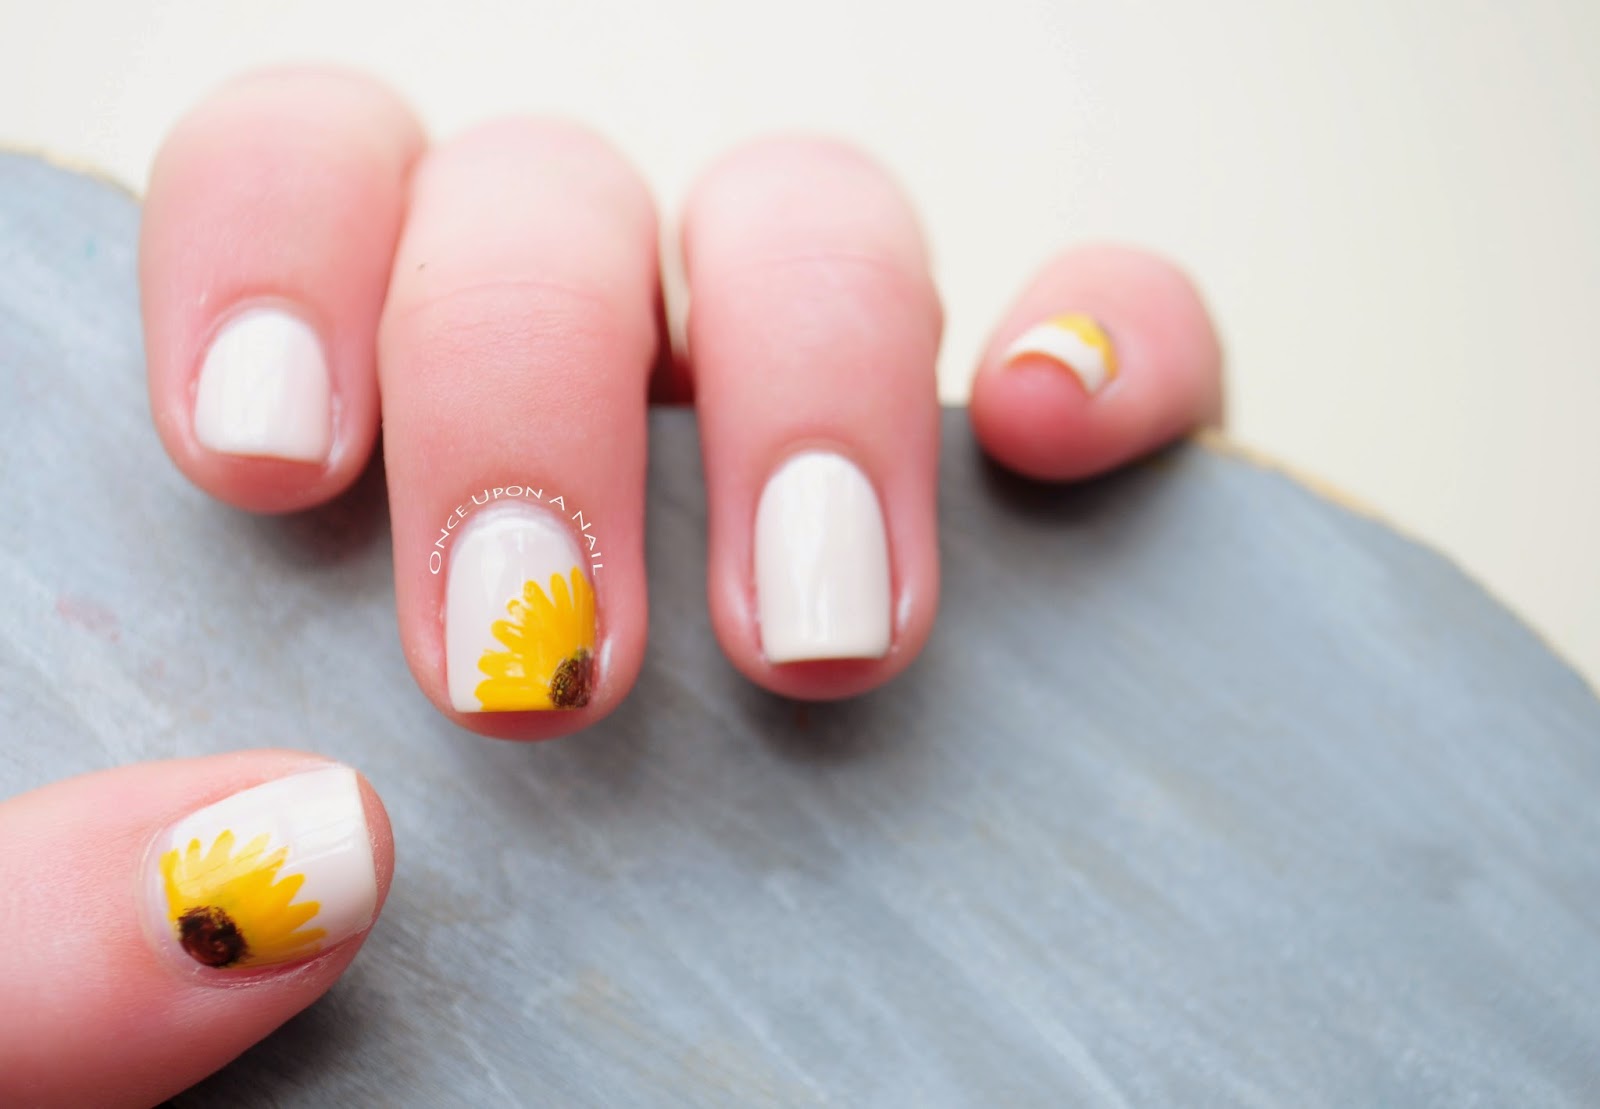
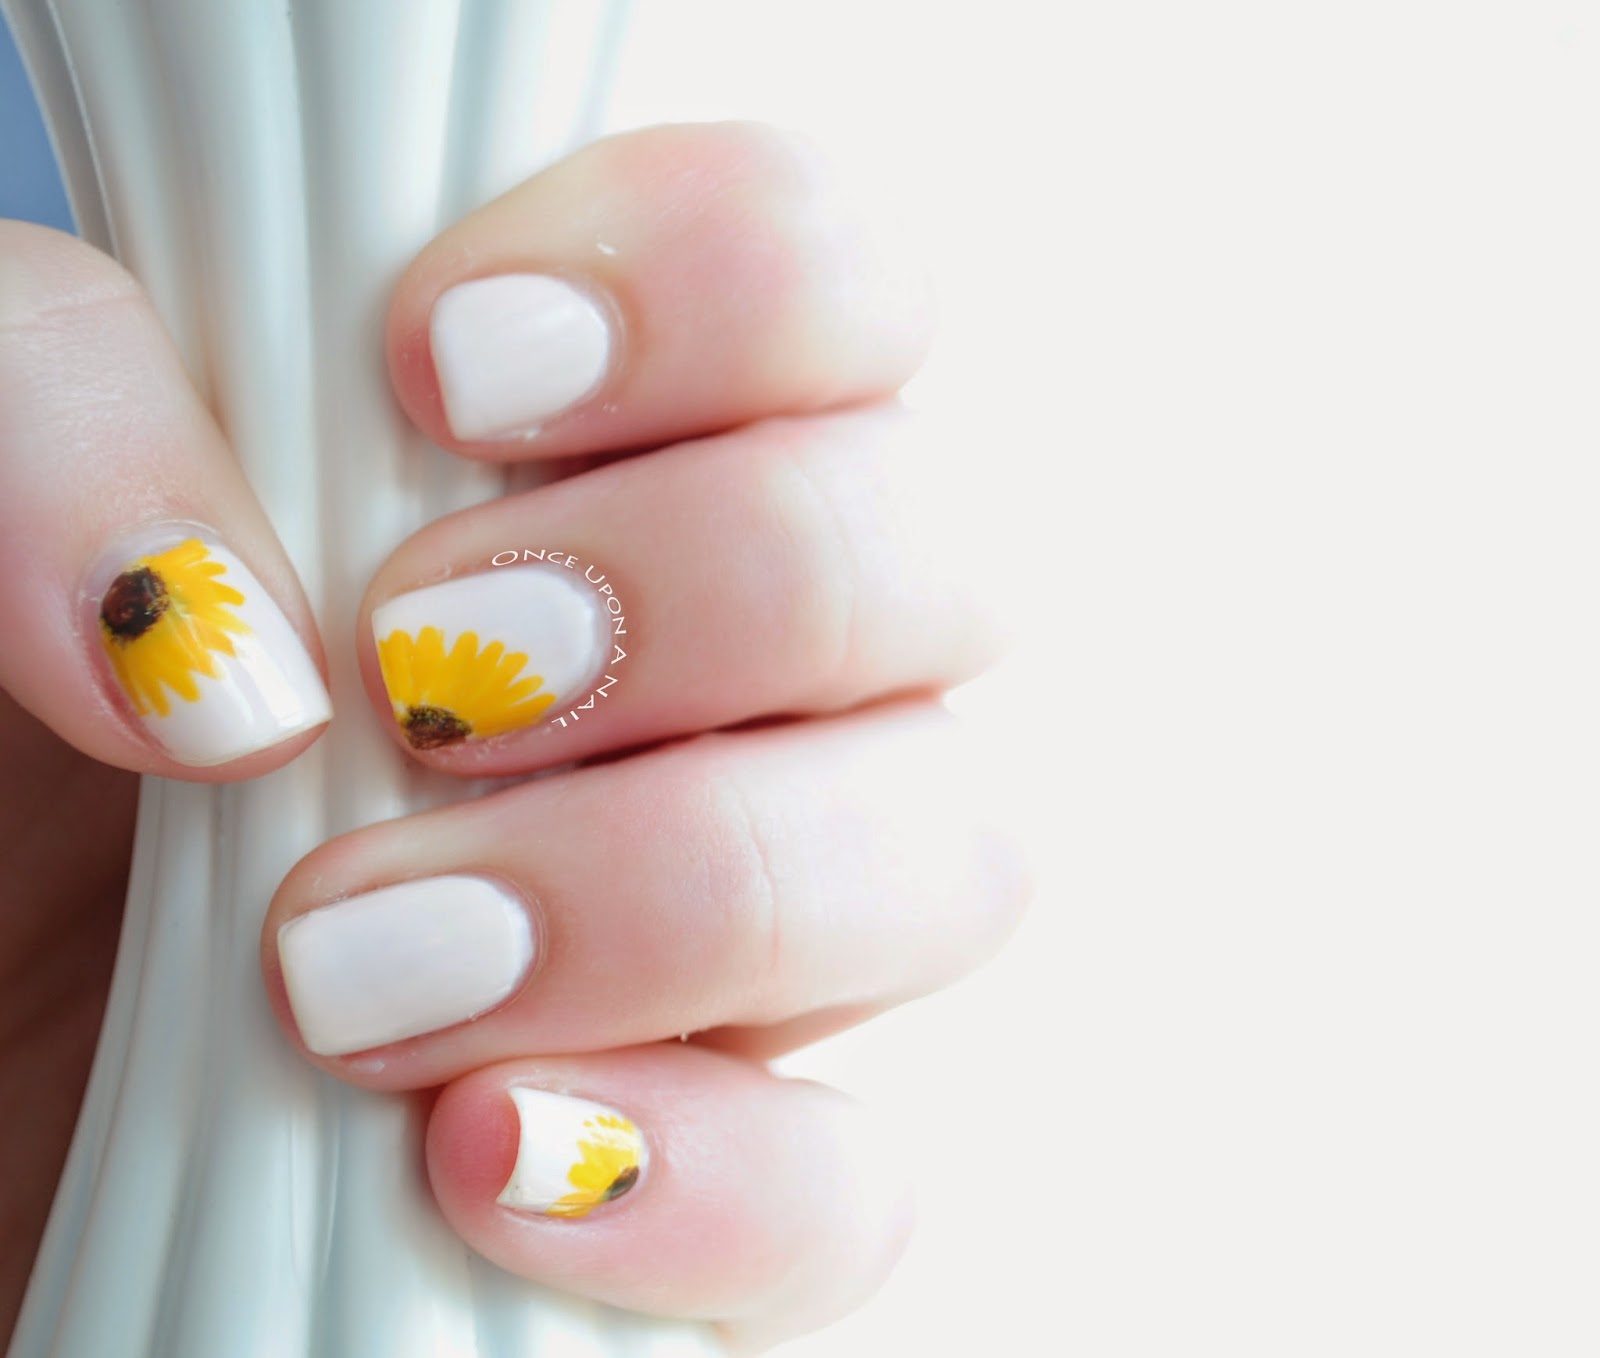
   This is another older creation. I think it was inspired by a nail pin. I don't know which one, but if you ever look through my Pinterest boards you'll probably find it.


   For this one I originally used a white base (which would currently be Finger Paints Paper Mache). For the vine stem and flower petals I used a pink acrlylic paint. The leaves were made with a Sally Hansen Xtreme Wear (Mint Sorbet?). I don't have that color anymore, so I'd use Revlon Brilliant Strength Entice. You can find the set here in my shop.

   This one is a super recent design. I made it a few weeks ago for a customer to choose from in a custom order. She chose a different design, so I decided to go ahead an put up this design. (If I want to put a custom design up in my shop permanently, I like to wait a while before I do that since they have to pay so much extra for a custom set. It seems a little fairer that way to me.)


   I got this idea from some pins we both collected for design possibilities. ...Which I conveniently can't find to show you guys. I think I searched "triangle nails" or "geometric nails," I don't remember which.
   I used L'Oreal Walk on the Beach as the base. For the triangles I used Sally Hansen Xtreme Wear Cherry Red, China Glaze Recycle, China Glaze Pelican Grey, and Pure Ice Bikini. Then I outlined the triangles with my white striper (Stripe Rite). Here's the link to the listing.


   For the sake of space, I think I will quit here for now. This is all of the new accent sets. I'll blog about the new full sets tomorrow. I also have a fun new Easter design to show you guys too! I'm super excited about it and can't wait to blog about it.

   I hope you all have a fantastic Easter!

Saturday, April 12, 2014

Tribal Toes

    Here's another of the designs I told you about yesterday! I finally painted my toes again. I had broken one about halfway down at a diagonal. :(  After a wait that seemed like forever it finally grew out enough that I felt like I could paint it and it not look terrible.

   For this design I was inspired by a pin, like I often am. I found this one on Pinterest a few weeks ago.


    I really liked that she not only had your typical triangle like you often see, but that it had the smaller design inside it. And it isn't your usual design either.


   I mainly just copied the triangle, as you can see. I couldn't decide what color to use as my base, so in the end I just grabbed something. I ended up using Revlon Brilliant Strength Entice as the base. Then I used my white striper (Stripe Rite) to make the triangle, and my black striper to outline and create the inner design. As a last minute detail, I added Maybelline Color Show Bold Gold as an outline for the two larger triangles. I wan't quite satisfied with no outline, but again, I didn't have any great ideas for the color, nor was I sure I would have the space.


    Here's a close up if you want to see. I normally don't do this because feet always seem so private to many people, but this is such a detailed design I thought you all would forgive me. :) You can still see a little where my nail had broken. It's not completely grown back out, but it looks a ton better than it did!

   That's all for now. I'll have more news for you Tuesday or Wednesday, I think. I have a some commissions to do that should be finished by then!

   Have a great week!

Sunflowers

   I have several things to show you this week! This is the first of three. (I don't want to make one post and have it be super long, so I'm dividing them up! And one of the designs might still be in progress...)
   I am sort of, but not really, deviating from my Etsy-to-Fingers Project (I keep changing the name, I know - I've always been terrible with names). I've recreated an older design that I painted on my toes for my brother's wedding.


   I really like it! Simple, yet pretty. And it helps that sunflowers are one of my favorite flowers! I originally wanted to put in some greenery on my pointer and ring fingers like on the original, but I just couldn't make it look right. After having it on for a whole day and sleeping on it, I like it best how it is. Maybe if I ever needed to dress it up I could add some swirly vines or something, but I really like it simple.


   This is the original. The green looks really nice in there with the sunflowers. But, in case you hadn't noticed, toes are really big! You can fit all sorts of stuff on them! Unlike fingernails. At least, mine at any rate.


   I bought some new polishes the other day, which is what brought about this design. I had wanted to recreate the toe design for Etsy for a while, but I had run out of the tan-ish color I had used (Sally Hansen Hard as Nails Sheer Vanilla over a white base). After looking around a bit, I settled for the color you see - Revlon Colorstay Pale Cashmere. I really like Revlon's Colorstay and Brilliant Strength Polishes. They go on really nicely and last pretty long.
   For the sunflowers I used another one of my favorites for the petals - Sally Hansen Complete Salon Manicure Butterscotch. I just really love those buttery yellows! For the centers of the sunflowers I used Finger Paints Sketchy Character. I applied them both with a small brush.
   Then to finish it off, I applied my new topcoat that I splurged on - Seche Vite. It's really nice and worth the $8 result wise. However, I'm not sure if I'll continue buying it. For one, $8 is a lot of money for one bottle, especially if you're cheap like me. The biggest issue for me though is the smell. It really stinks! It's super strong and hangs around. I might get used to it, we'll see....


   As I mentioned, I made this into an Etsy set. You can find it here, if you like. I might play around with it and add an option for swirly vines... I'm not sure yet! For now, it's just going to be simple.

   More updates to come! I've finally painted my toenails again, and I've got a couple commissions coming up too...

   I've had the entire weekend off for the first time in, well, probably ever, and it's been great! I've been busy sanding some chairs for my apartment next year. I'll be painting them white to match the base of my table. I'll have to take some before and after pictures to show you guys whenever I finish! I've got four to sand and paint, so I'm sure it will be a while.
   I hope you all have a marvelous weekend/week!

Thursday, April 3, 2014

Nautical

   What do you all think of my new layout? I thought it was time for a change. My old design was never quite what I wanted, so I changed it! I might still fiddle with my logo, we'll see. I hope you guys like it! If not, well, you're stuck with it for now. :)

   I've got another design to show you already! Hopefully all these updates is a good sign; maybe I'll finally become a more consistent blogger. Maybe. If we're both lucky.
   Another Etsy listing this week - my nautical set. You might have seen them before, I blogged about it a few months ago when I first made the set for Etsy. It's a very summery design, which I love! It's finally warming up here and I'm so excited!


   I had planned to use tape to mark of the stripes like I did the first time, but I forgot to paint the white the night before. I always have a problem with the polish coming off with the tape if I don't paint the base layer several hours before. Maybe it's just me, I don't know. I haven't heard much about other people having this problem...


   I used Finger Paints Paper Mache and Stripe Rite Red for the stripes. The yellow was Covergirl Outlast Lemon Drop and the blue Sally Hansen Complete Salon Manicure Resurrection. For the anchor I used Sally Hansen Hard As Nails Pumping Iron.


   It didn't turn out quite like I had hoped - my nails are so much smaller than the fakes I use to paint my demo sets for Etsy! It makes it a lot harder than you would think to do something the first time on a larger nail and then try to paint it on a small one. It was hard to get the proportions right. My anchor turned out a lot better this time though, I think.
   I had been inspired by a few pins I had come across while looking up design ideas for a custom order over in my Etsy shop. I found some really cute designs with polka dots and gold glitter mixed in with the stripes and/or anchor. If I ever make another version of this I'd definitely have to include those!

   That's all my news for now. I probably won't have anything new until late next week. I'm taking a break from both jobs on my next day off. Then it's back to work as usual! I have another pending custom design that I think you all with love! It's pretty trendy and cute!

   Have a wonderful weekend guys!

Tuesday, April 1, 2014

New Listings!

   Hey guys! I've been busy this week creating new listings and working on orders, so I've got lots to show you all. Hopefully I'll get a true day off on Saturday to do other stuff. I don't know what I'll do yet, but it won't be nails or JoAnn's! Don't get me wrong, I love nail art, but everyone needs a break! I feel like I've been working on orders non stop lately! Which is good really, since it give me some money. :) 
   Speaking of orders, I'VE HIT 100 SALES!!!! It's so exciting! I think I've had about 56 actual orders, but I've sold 109 individual sets.

  I've added two new sets and have started changing my listing pictures, so my shop is starting to look a little different. It's exciting! Just because I can, here are some screen shots:


   I'm about halfway through painting all my sets! Hopefully by summer (or at least the end of it) I can start painting other stuff on my own nails again.
   This was my project this morning, getting all the solids photographed.


   I've finally gotten around to putting up a polka dot set! It's been on my to-do list for ages, I just never got around to it, like usual.


   I have several different color options:


   Wouldn't want to give you too many choices... :)  You can find the listing here.
   The colors I used are:
         Pure Ice Bikini
         Orly Teal Unreal
         Loreal New Money
         Loreal Royally Reinvented
         OPI Vant To Bite My Neck
         Finger Paints Paint Me Happy
         Sally Hansen Xtreme Wear Cherry Red
         Finger Paints Paper Mache
         Sally Hansen Xtreme Wear Black Out

   I also listed a version of my Valentine's nails. I made all the nails the same checked design instead of having the lace heart accent.


   I absolutely love this design! I think it's so cute. You can find the listing here.
   To make this design I used Finger Paints Paper Mache as my base. Then with a small brush I painted on the green 'stitching' with Revlon Brilliant Strength Entice. After that I used my dotter to start the hearts and a brush to finish them. Then I covered it all with my top coat - Revlon Multi Care Base+Top Coat.

   That's about all my news for now. I still have earrings to blog about, but I have to take pictures of them first... Maybe I can do that Thursday or Saturday. We'll see how that goes...

   I hope you all have a fantastic week that isn't too crazy!